Take one look at Alan Madison’s office wall — covered with high-yield contest plaques, awards and honors — and you can immediately tell he’s been on the cutting edge of conservation ag for quite some time.
“Some of those high-yield contest winning plaques from the late 1990s are barely over 200 bushels. Now in 2024, we’re over 300 bushels, so by 2040 we ought to be over 400 bushels,” says Madison, with a smile that grows even bigger when he points to the Conservation Legacy Award plaque hanging on the middle of his wall.
“I worked for the NRCS from 1970 to 1997,” he says. “We started really promoting no-till in the early 1980s. I was no-tilling my corn and soybeans by the mid-80s and then we transitioned to strip-till in the late 1990s.”
Madison now strip-tills 100% of his corn-corn-soybean rotation across 2,000 acres in Walnut, Ill. Why strip-till? He rattles off 6 reasons: soil temperature, moisture, soil density, allelopathy, early rooting and higher yield potential. Madison breaks down his system into 8 steps, each one critical to maximizing the benefits of strip-till.
Steps 1 & 2: Soil Test, Correct pH, then P & K
Madison takes soil samples across 1-acre grids every 2-3 years before building his nutrient management plan for the upcoming growing season. He uses an Ag Leader SMS mapping program to analyze the results.
“We have to figure out where our nutrient and pH levels are to begin with,” Madison says. “The easiest thing to correct is pH by spreading lime, and that can make a huge difference on yields, especially with soybeans. Phosphorus and potassium can be a little trickier.”
Madison variable rates lime to balance his pH, and he applies phosphorus (P) and potassium (K) — usually about 100-125 pounds of P and 150-200 pounds of K per acre — ahead of corn in the fall with his John Deere 12-row strip-till rig.
“We used to make strips 8-9 inches deep, but didn’t see any advantage to placing the fertilizer that deep…”
“And for the last 4 years, we’ve also been using MESZ (MicroEssentials SZ from Mosaic Crop Nutrition), so there’s some sulfur and zinc with the P and K,” Madison says. “We put some urea in there as well ahead of the second year of corn-on-corn sometimes.
“We used to make our strips 8-9 inches deep, but we didn’t see any advantage to placing the fertilizer that deep. Now, we go about 5-6 inches deep because we want to move it a little closer to the seed.”
Step 3: Check Compaction
This could be the initial step for first-time strip-tillers. Madison says if there’s significant compaction in a field, it probably needs to be ripped up before implementing a no-till or strip-till system.
“See if there’s a restriction zone, and get it eliminated before you commit yourself fully to strip-till,” Madison says. “Break up the compaction and give it at least 3 years with strip-till before you start seeing the improvements in soil structure and health.”
Madison uses cover crops on all his acres as a tool to help break up compaction and improve the overall health of his soils. He grows 10-15 acres of cereal rye for seed, which gives him more than enough for at least 1,000 acres.
As soon as harvest concludes, he broadcasts about 40-50 pounds of cereal rye per acre with a pendulum spreader. It spreads 40 feet while going 10 mph and holds enough for 40 acres at a time.
“If you’re familiar with rye, you could put it on concrete with a little dew in the morning and it would grow. It’s an aggressive plant and grows pretty easily,” Madison says. “It helps with erosion control and the capturing of nutrients. But you’ve got to give it time — at least 3 years to get the whole system working for you before seeing the full benefits.”
Madison makes fall strips about a month after seeding the cereal rye. Using a Hagie sprayer, he terminates the rye with glyphosate as early as 10 days before planting corn. He sometimes plants soybeans green into living rye — if it’s not too tall — before terminating it afterwards.
Step 4: Use Proper Strip-Till Equipment
Finding the right toolbar setup for your unique environment is another critical step, says Madison, who’s tried several different strip-till rigs over the years. He started with a DMI anhydrous bar but found that it wasn’t making strips wide enough for his system.
“That’s kind of the secret, especially with cover crops being part of the system,” Madison says. “We’re making strips a month after seeding the rye, and we want that strip wide enough to get the cover crop out of the zone we’re going to plant into.”
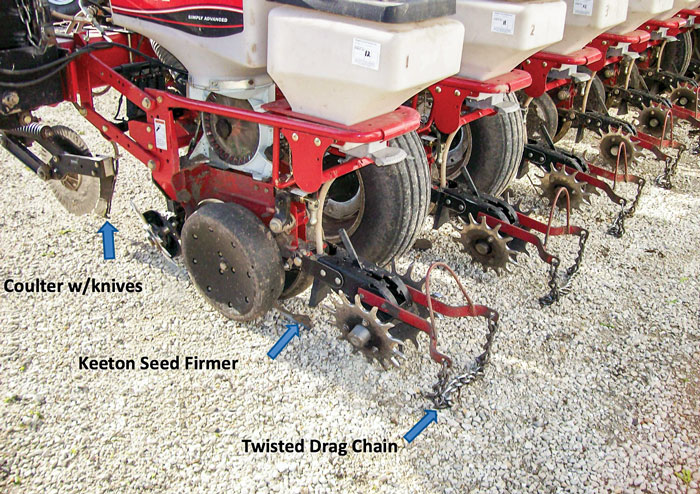
ALL-STAR ATTACHMENTS. Madison has seen a huge ROI from his planter attachments, which include row cleaners, Keeton Seed Firmers, spiked closing wheels and drag chains. Alan Madison
Madison used a Kuhn Krause 8-row Gladiator for about a decade before switching to his John Deere 12-row shank unit with row cleaners and closing discs.
“If you’re doing corn-on-corn, you have to make sure you have a machine that’s capable of going through heavy corn residue without plugging up,” Madison says. “I know quite a few guys in our area that run into problems, especially in the morning when it’s wet and cool. You might want to wait until the stalks dry up a bit before making strips. A little patience could go a long way.”
Step 5: Equip the Planter
Madison’s Case IH 2150 16-row planter is equipped with row cleaners, disc openers, gauge wheels, Yetter Spiked Closing Wheels and downforce that allows him to adjust from the cab. He also uses GPS auto-steer to make sure his planter is lined up with the strips.
“We go through our planter every winter in the shop — checking disc openers, setting depth control across each row unit and making sure the closing wheels in the back are lined up,” Madison says.
He uses the same planter for corn and soybeans, both planted in 30-inch rows. Madison always plants soybeans first in early April before moving on to corn. His soybean plant population is 110,000 and corn plant population is 34,000.
“We were higher than that 4-5 years ago,” Madison says. “The varieties seem to respond better to the lower population. We’re getting deeper kernels and heavier test weights. Pushing the population with corn, depending on the variety, doesn’t really help us.”
Step 6: Use Starter Fertilizer
Even though he’s getting ready to pass the torch to his grandson, Madison is still constantly looking for ways to improve his system. He conducts on-farm fertility trials every year, many of which influence what he’s applying and when. He concluded a long time ago that starter fertilizer with the planter is a must for corn and soybeans. Madison’s starter mix includes 3-3.5 gallons of 10-34-0, 0.25 gallons of zinc, TerraMax MicroAZ for root enhancement, Verdesian AVAIL T5 to increase P uptake and 1 pound of sugar.
“We want the strip wide enough to get the cover crop out of the zone…”
“Sugar provides energy for the microbes,” Madison says. “I get it from Costco, Rural King or wherever I can find it for the cheapest price. I mix about 200 pounds of sugar with 200 gallons of water and the zinc as well. For soybeans, I also include fungicide and insecticide in the sugar mix.”
He shoots for a total of 25-30 pounds of nitrogen (N) ahead of corn, either with the strip-till rig in the fall or his starter mix in the spring. Madison also includes some UAN 32% in his pre-emergence herbicide program.
Step 7: Sidedress N if Needed
Madison sidedresses his corn every year, applying 32% and Thio-Sul with his Case IH liquid sidedress bar around the end of May or beginning of June. He puts a “high-rate strip” in every field to gauge if the crop needs more than one in-season application to get to the finish line.
“We sidedress at our normal rate — which might be 125-135 units of N — and then the high-rate strip will be 50 units higher than that,” Madison says. “Then at V-10, we take a chlorophyll reading with a SPAD meter that clips onto the leaf. We see what the reading is on the high-rate strip, then get readings from parts of the field with the normal rates and see how much difference there is. If it’s 3-4% below the high-rate strip, then we know we should probably add some more N with Y-drops on our Hagie sprayer.”
The Y-drops are usually good for a 5- or 10-bushel bump, Madison says. He’s tried other techniques to evaluate the in-season nutritional needs of his crops, but the chlorophyll-reading system, which he’s used for about 30 years now, has proven to work best.
“The problem is we’re doing the chlorophyll reading at V-10, in the morning when the leaves are wet or the afternoon when it’s 90 degrees, so it’s not a popular job,” Madison says. “I used to do it myself, but now I have grandkids I can send out there to do it.”
Step 8: Plan Ahead, Harvest Early
Madison starts setting himself up for the next growing season as he’s combining in the fall. With corn-on-corn, the earlier you harvest, the better, he says. That means planting early-season hybrids in the spring on some acres and using chopping knives on the corn head.
“If you’re going corn-on-corn, you need to get an early-season variety out there so you can harvest earlier, and let the residue start to break down and decompose in the soil,” Madison says. “We have a continuous flow dryer, so we’ll start harvesting when the corn is at 28% moisture and that’s usually around September 20.”